Showing posts with label DIY. Show all posts

Monday, September 16, 2013

Tid Bits

I've neglected this blog for a month and I feel horrible about it, but I just can't seem to find the time (or the energy) to do anything about it.  As it is, you are only going to get bullet points today!

Here's a recap of the past month....

  • I still have my rash!  This Wednesday will be 16 weeks and I still don't have any answers.  I'm still seeing the specialist and they are still running tests, but at this time there is no prognosis.  I am on multiple medications to handle the itching and doing light therapy twice a week, but I wish they could diagnose me with something so that we could take care of this once and for all.  And more importantly, so we could figure out what is causing it.


  • Lainey has started physical therapy so we drive 1-1/2 hours twice a week for her appointments.  Tomorrow will be her 8th session so we are halfway done. 
    They do laser therapy, muscle building and strength exercises, and water treadmill.
    She has made huge improvements and I am so thankful for the doctors we are seeing.

    Here is the water treadmill....she is waiting for the tank to fill up.

  • We began to notice that Lainey was only limping and/or not using her bad leg while at home, but if we were out in public she would walk fine. She would be completely fine at my parents house, my sisters house, and a friends home, but would act all funny at home. We were advised by Lainey's physical therapist that it was most likely due to our hardwood floors at home.  She wasn't feeling confident enough with her leg and was too worried about slipping and sliding on the floors.  We just put them in 2 years ago, so there was no way that we were going to get rid of them (or cover them with a bunch of rugs).  So, our only choice was to buy huge pieces of remnant.  I hate how it looks, but she is a whole different dog since putting these down.


  • It's officially college football season!!!  Yay!!  My husband and my dad got an early Christmas present....Go Blue!!!


  • What little free time I've had has been spent doing a couple projects at home.  My stepson's bedroom had never been touched and was the last room in the whole house that was still that beige color that was on every wall when we moved in.  He is 17 and very rarely at our house anymore so I wanted to make it more "grown-up" so we could use it as a spare bedroom.  I love the way it turned out and even happier because he loves it to.  I ordered some wall décor that should arrive this week and then the room will be complete.

BEFORE ~ This is a picture from the day we moved in

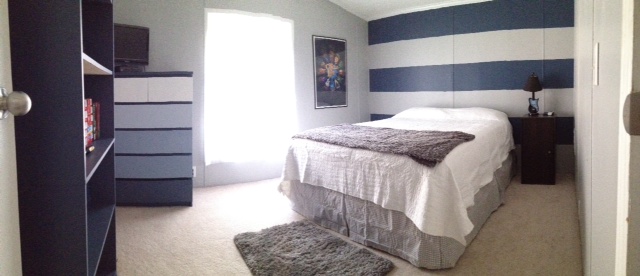
AFTER ~ No more beige :)
We used the same grey from the Living Room/Dining Room and accented with Dark Blue
(we have also added curtains since this picture was taken)

I also decided to try a little DIY project and make my own curtains.  I've been looking for low cost ideas to change up our living space and when I started pricing new curtains I about lost my mind.  I even tried to find some on Etsy and still couldn't justify the prices.  Since I can't sew, I did a little search on google and Pinterest to find a "no-sew" method.  After watching a few videos and reading a couple blog posts, I decided to give it a whirl.

I went to JoAnn Fabrics and picked out these fabrics (great for our fall décor).  I also picked up some twin white sheets from Walmart to use as the lining.  Four curtain panels for just over $50...Can't beat it!

Chevron for the Living Room and the Polka Dots for the Dining Room
Here is the final result....I love them (and so does the hubby).  It is just that small change I needed.


  • And to end this....here are some adorable pics of Lainey in her new Doggles.  She insists on having her head out the car window for the ENTIRE drive to physical rehab and I was so worried about debris getting in her eyes. Hopefully, she will get used to wearing these and then mama won't have to worry and stress so much.


Sorry for my absence...let's hope another month doesn't go by before I stop by here.  At the least, I can promise that things in my life should slow down about November and I hope to be back here more regularly.


Monday, September 10, 2012

Stressed to the Max

I apologize for my absence....Life has taken over!

As I sit at my desk on this brisk Monday morning, with an ice pack on my back, a bottle of pain killers next to me and black bags under my eyes, I realized that maybe it's time for me to slow down.  I've been go, go, go for about 3 weeks now and my body is finally telling me it needs some rest.

It all started like this.....

There was a huge landscaping project that I knew I wanted finished before winter, so I decided to take the week before Labor Day off from work and get it accomplished.  And since I was already going to be off work, what a perfect time to have a garage sale (yes, that is how my twisted mind thinks)!

On Tuesday morning there were 15 yards of stone dumped on the side of my house.  It took 2 loads to bring it, as the truck could only hold 10 yards at a time.


Load #1
My little brother and I worked for 2 days spreading stone and laying edgers.  It was way harder than I had anticipated.

I was so excited that I forgot to take any "before" pictures.  I just happened to come across this old picture this morning though, so it will have to do.  Please disregard the numbers hanging from our dog run...I was spray painting our table numbers for our wedding.


"BEFORE"

 
"AFTER"

I know that our lawn is not the best looking.....that is next years project!


"Before" shot of the opposite side of the yard (we only added stone to the back corner and all the way up the side to the left.  You will also notice in the "after" picture our new fence)


"AFTER"

We worked on the rocks Tuesday and Wednesday, then Thursday we started pulling everything out for the garage sale the next day.  I had no idea how much stuff we had!!!  My original thought when I planned the garage sale, was to hopefully make enough money to pay for the rocks.  My new thought quickly became.... PRICE LOW AND GET RID OF EVERYTHING! And that's exactly what we did.  I can happily say that we started out Friday morning with ten 8' folding tables, a rolling closet with hanging clothes, a 15' long rack of hanging clothes, and tons of stuff just laying out in our yard.  By the time we shut down on Saturday I was able to pack all of the remaining items into 4 plastic storage totes!  AHHHH-MAZING!!  And the extra bonus is that we made enough money to pay for over 80% of the cost of the rocks.
 
By Saturday evening I was exhausted, but it was the opener for Michigan football so we decided to go over to my parents house to watch the game.  While we were there I noticed that Lainey wasn't acting herself.  Kind of low-key, not wanting to play with the other dogs and really keeping to herself.  As the evening went on I noticed that she had started limping (again) and she couldn't even get herself in standing position by herself if she was laying down.
 
Long story short....by Tuesday she could no longer walk on her own, so after talking to the vet for about 45 minutes on the phone, we decided to put her under anesthesia and do some testing.  She has been having problems with this same leg since May and we have tried bed rest, chiropractor, acupuncture, supplements...obviously, nothing has been successful.
 
The end result is that she has a torn ACL in her left knee and will undergo surgery next Wednesday.  In the meantime, we have to keep her "contained" as to not further damage the ligaments.
 
Here is her new "hospital room" as we call it


She has been confined to this space about 99% of the time since Wednesday and she is handling it very well.  I think it is harder on me to see her like this, than it is for her actually being stuck in there.

You can tell she doesn't feel well

Our jack russel, Stewie, sits on the outside peering in through the holes in the gate at her.  He can't understand why she can't come out and play.  So, every once in a while, we let him in there with her for "visiting hours".


Please keep us in your thoughts and pray that surgery goes okay next week.  I will try to keep everyone posted.

It's time to apply the ice pack to my back again so I must go....Until next time!


Friday, June 1, 2012

Salon Effects

I'm always amazed at all the fancy nail art pictures on Pinterest.  I can oooh and ahhhh over them all I want, but I don't have the patience or creativity to do it on my own.

And then I came across Sally Hansen Salon Effects while shopping in Target.


Each kit contains 16 nail polish strips, cuticle stick and mini file/buffer.

I am currently wearing 310 Wild Child


Application instructions are included with each package and are very easy to understand. You select the correct size strip for each nail, peel off the protective film, detach the polish strip from the backing, press on to the nail and file off the excess. What’s great about these strips is that each end has a different shape, one rounded the other squared, so you can find a good fit for your cuticle line.

Application tips:
  • Warm the strips with your hands to make them more pliable.
  • Bend the strip over your free edge and use the file to remove the excess rather than tearing it off. Tearing can result in an uneven edge.
  • Between sizes? Size up and use the enclosed cuticle stick to remove the excess off your skin.
I definitely need some practice applying them, but I look forward to using them again in the future. I just can't decide what style to choose next

Wednesday, March 21, 2012

Make a list and check it twice

The hubby and I sat down the other night and discussed a few home improvement projects.  There is a lot that we want done, but it is hard to prioritize.  I'm not very good at deciphering between a "want" and a "need".  I decided to make a list so we could SEE what we were dealing with. 

As we started looking at the list we realized that item #2 couldn't get done until Item #3 was complete.  And Item #3 could not get done until item #4 was complete.  And on and on it went....we finally realized that there was definitely going to have to be an "order" in which these items were completed.  And the order that we came up with is not one to make me happy.  The first item on our list is the most expensive and I really, really hate big purchases.

Here is the list of things I would like to have done by the end of the year(assuming our finances allow it)

  1. Have central air installed along with a separate furnace for our basement
  2. Build a deck in our backyard
  3. Install sliding glass doors in our dining room to access said deck
  4. Install privacy fence on the one side of our backyard that does not already have it
  5. Replace all the screens in our windows (they are all broke and/or missing)
  6. Replace all the old mulch with new
  7. Paint the laundry room
  8. Paint the master bedroom
  9. Paint one of the spare bedrooms
  10. Install a new front door
  11. New counter tops in kitchen
This is not even the entire list, but only the "high priority" items.  I have a feeling it will be another 3-5 years before our list is completed.  It's a good thing we don't have any plans of moving any time soon!

If only I could win one of those HGTV makeovers.....

Wednesday, February 8, 2012

Getting the itch

I'm not sure if it's all the nice weather we've been having or what, but I'm getting the home improvement itch!  We didn't do anything all winter to the house and now I'm ready to get started.  I've got a bedroom and laundry room calling for attention.

First on the list is the Master Bedroom.  Our bedroom has been the one room in the house that I just can't figure out.  I have painted, repainted , changed window treatments and changed the bedding about a gazillion times in the past 3 years and still...still, it is the one room I cannot stand to be in.

I have really been concentrating on this one room and I think I finally figured out one of the major issues I have....IT IS SO DARK! 

It is a fairly small room that is filled with a lot of BIG pieces of furniture.  My first thought was to downsize the furniture, but that is impossible considering that my husband can't get into any of the closets in the house (the doorways are too narrow for his wheelchair), so his only way to store his clothes is in the 2 dressers and huge armoire.

Our room is about 12'x12' and here is all the furniture we have in there:

Large Armoire (from Meijer)

Smaller dresser for t-shirts, socks and jewelry (from Ikea)

Larger Dresser (from Ikea)
Bed Frame (from Art Van)
Do you notice anything similar about all of these pictures?  Everything is SO DARK!!

After coming to this realization, I had the idea to paint the armoire white to see if it would make any difference.  It is the largest item in the room (besides our bed, which is leather and can't be painted) so I figured it would make the biggest impact.  And boy oh boy....does it ever make a difference!  We purchased new bedding, changed the curtains and painted the armoire!  It is like a whole new room!  We have chosen our paint color for the walls and hope that when it is all said and done, this will be a room that I will finally enjoy spending time in.

Before and after pictures to follow once the room is complete.

Do you have a room in your house that just doesn't fit your style?

Monday, September 19, 2011

Kitchen Cabinet Makeover - Complete!

My kitchen cabinet project is finally DONE!!!
Pictures to follow soon. (my iphone was broke all weekend and my digital camera got left at work)

Thursday, September 8, 2011

Kitchen Cabinet Makeover - Continued

Slowly, but surely, I am making progress on our cabinets.  It makes for a long project when you can only work on the weekends.

Our kitchen basically has 4 sections.  The bar, the area with microwave, the area with stove and the area with the sink and fridge.  I am done with 3 of the 4 sections and have started the final section.  I hope to finish the final section this weekend and then I can put my kitchen back together.

Here are some updated photos of my progress:

BEFORE:


AFTER:

Sections 1 & 2 Finished


Section 3 Finished

Section 4 "Partially" finished....

 I am so happy with the transformation that has taken place.  I truly believe that all my time and effort will be worth it once I am done!  The kitchen is modern, brighter and feels "clean"!


Tuesday, August 30, 2011

Kitchen Cabinet Makeover

One of the main things I wanted to change when we bought our house was the kitchen cabinets.  Our house was renovated before we bought it, but the kitchen did not get even half the attention of the rest of the house.  The previous owner did put all new cabinet doors on, but left the old frames.  So, if you look closely you will notice that the doors and drawers are not the same wood as the frame itself.  Also, all of the cabinets under our sink area were not updated and they didn't match any of the other cabinets.  It drove me crazy!

In the first year of living in our new home, I had a local company come and quote me to stain the cabinets.  Needless to say, it was way more money than what I had intended to spend at that time.

Then, just recently I had a company quote me to paint the cabinets.  Again, the amount of money was ridiculous!

At this point I knew that if I ever wanted these cabinets changed, I was going to have to do it myself!  And that I did (or am doing).

Here are a couple pictures of our kitchen the first week after moving in.  In the first picture you can see our new cabinet doors and if you look closely you will see that they don't match the frames.  In the second picture you will see how the cabinets under the sink share no resemblance with the others.


A couple weeks ago I stumbled across a product called Rustoleum Cabinet Transformations.  I immediately showed my husband, and we watched the tutorial video, looked at the before/after pictures, used the virtual tool and then agreed that we were going to try it.

With Rustoleum Cabinet Transformations there’s no stripping, no sanding and no priming required, so its super easy to do!  And the best part is the price!  A small kit will cover 100 sq ft and was around $79 and a large kit will cover 200 sq ft and cost about $140.

You can choose from 70 different colors and finishes so there is no doubt you can find the custom look you are going for.

There are four easy steps:  1.  Apply Deglosser to degloss the surface  2.  Apply Bond Coat (this is the paint color)  3.  Apply Decorative Glaze (optional...we did not do this)  4.  Apply Protective Top Coat

Although, this process is pretty simple...it is very time consuming.  Especially because I am doing the project on my own.  If you had more than one person I'm sure you could finish your kitchen over a weekend.  At this point, after 2 weekends, I have half of the project done!  I just hope I don't run out of steam before I'm finished!

Here are some photos of my progress so far!  Please excuse the messes inside the cabinets and also the photo quality is poor as these were taken with my phone.


Before


After applying Coat #1
(we ended up needing 3 coats instead of the recommended 2)

Coat #1 on the backside of the doors
(we did 3 coats on the front and only 2 coats on the backside)

Upper Frame Complete

Slowly but surely making progress
We decided to add new hardware to the cabinets for a more modern feel.  All in all, this project has cost us less than $300 and that includes 30 cabinet pulls, the transformation kit and all of our supplies.

Note:  We have noticed that some oils from the wood are seeping through a few of the cabinets causing yellow/brown streaks.  I contacted Rustoleum yesterday and was told that certain types of woods contain more oils than others.  He recommended deglossing those doors again, coat with an oil based primer and then finish with the bond coat and protective coat.  Rustoleum is going to reimburse me for the cost of the primer as this product is 100% gauranteed!

Friday, August 19, 2011

Renovation Failure

When hubby and I bought our house we knew that we were probably going to have to do something about the carpet.  There was new WHITE carpet throughout the whole house.  It sure did look nice for about the first week, but then it became such a hassle.  I spent so much time scrubbing out marks on the carpet.  Not to mention that since my husband is in a wheelchair, we had many a battle between that chair and the white carpet.

Two years after moving in, it was decided that the white carpet had to go.  It was still in good condition, but I felt like it would be so much easier for my husband to get around the house if we had a smooth type surface.  I was also convinced that it would be easier to clean up all the dirt/mud/water that comes off the wheels of his wheelchair if we didn't have carpet. (you will see I was sooo wrong)

So, in January of this year we tore the carpet out and donated the carpet and padding to a fellow employee of mine who was in need.  And....we put down laminate wood floors.

The first couple weeks I was in awe....I would just sit and stare at the new floor with a cocky little grin on my face!  Our floors looked awesome! (see pic below)


I {heart} my floors!!
 But then the "newness" wore off and reality set in.  First of all, dark colored wood floors and white Jack Russell Terrier hair DO NOT MIX!!  I could swiffer the floors every 5 minutes and I would NEVER be able to stay on top of all the white dog hair.

Secondly, the amount of dirt/mud/water that comes off those wheels from hubby's chair is astounding!  If it rains outside....we have puddles of water to clean up.  If he goes out to the lake fishing....we have 1/2 a beach in our living room.  If he goes out to water the plants....we have dried mud particles everywhere!

It is a constant battle!!!

The absolute worst part of having wood floors is that no matter how many times you sweep or swiffer the floors, IT WILL ALWAYS BE DIRTY!  I could walk across our carpet and not realize it was dirty unless I stepped in something or noticed a stain.  But, walking across wood floors (especially in bare feet) is HORRIBLE!  Every little crumb, dog hair, cat hair, piece of dirt, etc. literally sticks to your feet.  Almost magnetized in the same way that a swiffer is.

Thirdly, this is not an ideal situation when you have white furniture.  I don't just "sit" on the couch.  I have to pull my feet up and get comfy.  But every time I do that, the debris from the floor (that are now on the bottom of my feet) gets wiped off onto the white cushions of the furniture.  So not only is the floor always dirty but SO IS THE COUCH!!


White couch.....Ugh!!

Don't get me wrong....wood floors are awesome (and a good selling point to new buyers), but I made a BIG mistake!  This was a total renovation failure!

I can't even begin to tell you how badly I want to rip out the floors and put down carpet again.  Definitely not "white" carpet, but something that would SAVE MY SANITY....because, I'm about to lose it. 

Can someone please convince my husband that this is a good idea?

Wednesday, July 20, 2011

Making a house a HOME!

I was looking through some old pictures of our house today and I was amazed at the changes that have taken place in the 2.5 years that we have lived there.  It made me very emotional thinking about all the ways in which we have made our house a "home".

Here are some before/after/current pictures of some of the changes we have made. (editors note:  I apologize for some of the picture quality...some of these came from my phone camera)

Living Room:


Living Room (before)

Living Room (before)

Living Room (just after moving in)
 
Living Room (just after moving in)
 
Living Room (after 1 year)
Painted the walls, swapped some furniture from the family room,
new rug and changed curtains/wall decor

Living Room (current)
Added hardwood floors

Living Room (current)
Changed pillows/wall decor

Dining Room:


Dining Room (before)

Dining Room (just after moving in)
New Light fixture above table


Dining Room (after 1 year)
Painted, changed curtains, new wall decor, tablecloth

Dining Room (current)
added hardwood floors & new table

Kitchen:

Kitchen (before)

Kitchen (before)


Kitchen (before)
 
Kitchen (just after moving in)
added stainless steel appliances
 
Kitchen (after 1 year)
added new floors

Kitchen (current)
painted walls & bar countertop
**Note: the blue is funky in this picture...sorry**

Kitchen (current)
new curtains

  Guest Bedroom:

Guest Bedroom (before)

Guest Bedroom (just after moving in)
 
Guest Bedroom (current)
painted walls, furniture & rearranged furniture
**iphone pic - very dark

 
Guest Bedroom (current)
painted bookcase, new bedspread
**iPhone pic - very dark


Guest Bedroom (current)
new bedspread & curtains
**Note:  wall decor has been added, but I don't have a current photo

Guest Bath:

Guest Bath (before)

Guest Bath (just after moving in)

Guest Bath (after 1 year)
added new floors

Guest Bath (past 3 months)
painted, changed shower curtain & painted cabinet under sink
Note: The green reminded me of toothpaste...didn't like it!


Guest Bath (as of 48 hrs ago)
painted (yet again) and changed shower curtain
Note:  I'm not sold on the yellow yet...and there is too much "white".  I'm thinking of
changing out the shower curtain (yet again) and maybe new rugs.  Plus, the wall decor still needs to be added.


Later this week I will show you the before/after of the outside of the house.